A good cutting board tells on itself fast. If it rocks on the counter, dulls your knives, or starts splitting after a few washes, something went wrong in the build. That is why learning how to make a cutting board for beginners starts with the basics that actually matter – stable wood, careful glue-up, flat surfaces, and a finish that is safe for food.
The good news is you do not need a full cabinet shop to make one. A beginner can build a solid, attractive board with a few common tools and a patient approach. The key is choosing a simple design and doing each step cleanly instead of trying to get fancy too early.
How to make a cutting board for beginners: start simple
For a first project, an edge-grain cutting board makes the most sense. It is strong, looks clean, and is much more forgiving than an end-grain board. End grain has a great look and can be easier on knife edges, but it takes more milling, more glue joints, and tighter accuracy. If you are just getting started, edge grain is the better place to learn.
A practical beginner size is around 10 by 16 inches or 12 by 18 inches, finished at about 3/4 inch to 1 inch thick. That gives you enough surface to be useful without making the glue-up hard to manage. You can always go larger once you know how your tools behave.
The wood matters more than most beginners expect. Stick with hardwoods like maple, walnut, or cherry. These are durable, food-safe choices with a tight enough grain for kitchen use. Maple is the classic pick because it is hard, stable, and neutral-looking. Walnut gives you deeper color. Cherry warms up nicely over time. Avoid softwoods like pine, and avoid open-pore woods such as red oak, which can trap moisture and food particles more easily.
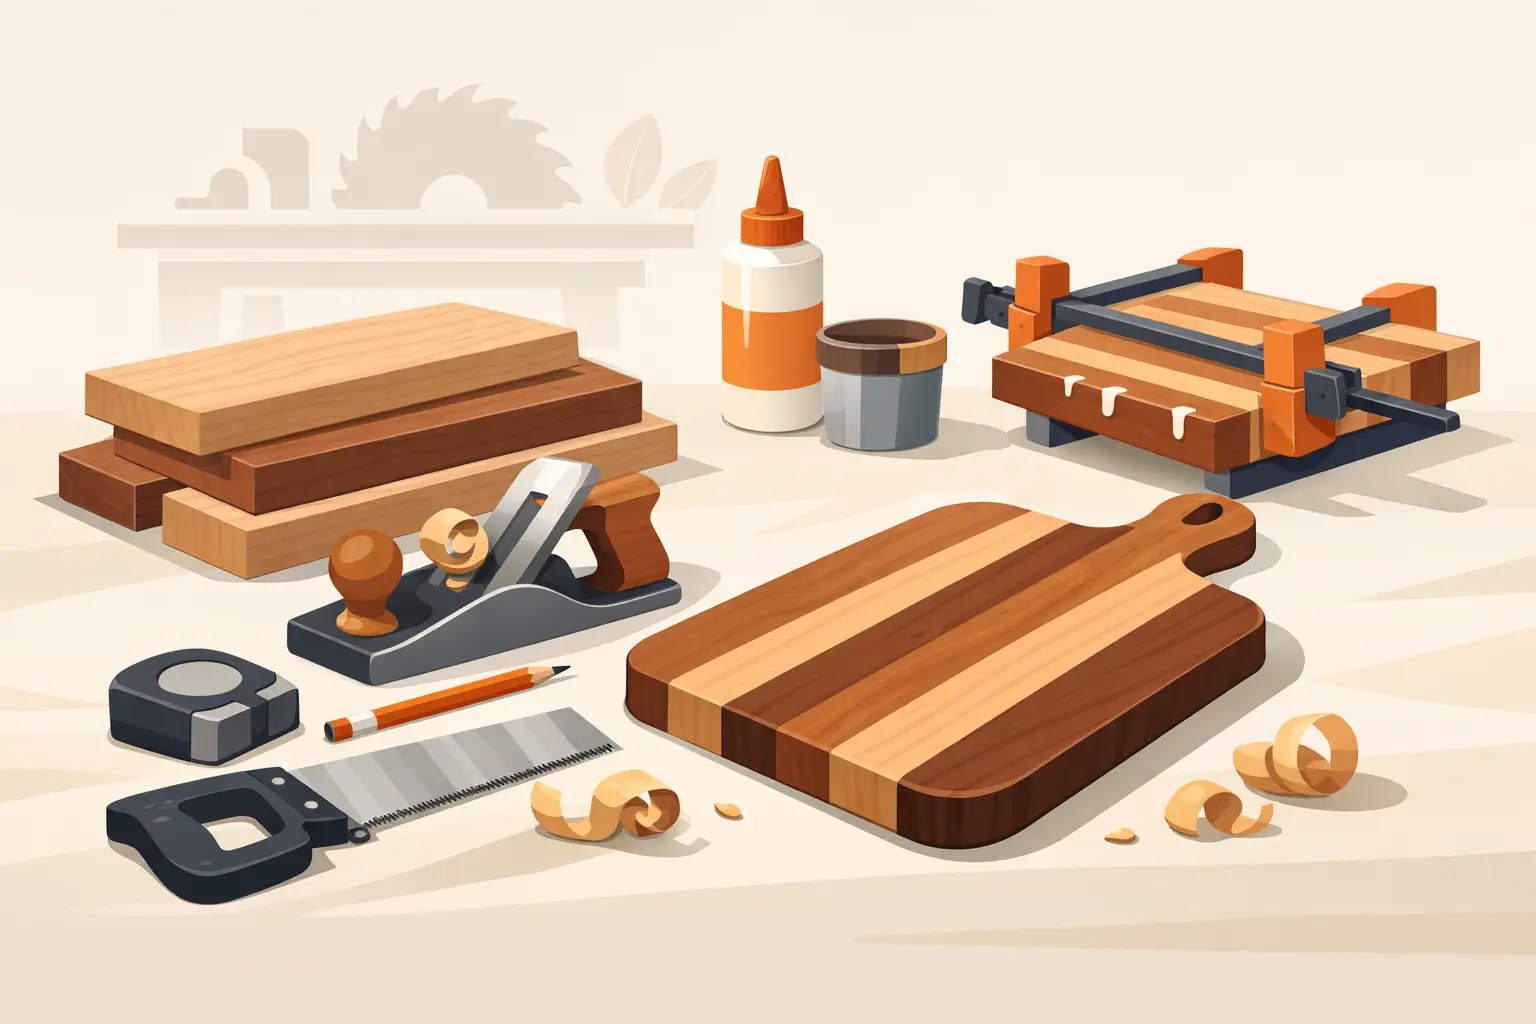
The tools and materials you really need
You do not need every woodworking machine in the shop. For a basic board, you need hardwood strips, wood glue rated for cutting board use, clamps, a saw to cut pieces to length, and a sander. A table saw helps if you are ripping strips from wider stock, but you can also buy pre-milled hardwood boards and simplify the process.
A planer is helpful, not mandatory. If your stock starts out straight and consistent in thickness, you can get by without one. The same goes for a router. It is nice for softening edges or adding handles, but a beginner can make a clean board with sandpaper alone.
What you cannot fake is flat stock. If your boards are twisted, bowed, or different in thickness, your glue-up gets harder fast. That is one reason many first-time builders do better starting with surfaced hardwood from a reliable lumber source.
Choosing and arranging your boards
Before you glue anything, lay out your strips and look at the grain. Alternating grain direction can help balance movement a bit, though wood still moves and no layout makes it motionless. More important for a beginner is appearance and fit. Shift the strips around until the color looks balanced and the seams close up nicely.
This is also the time to think about final width. If each strip is 1 1/2 inches wide and you want a 12-inch board, you will need about eight strips. Cut them slightly over final length so you can trim the ends clean after glue-up.
Keep your first design simple. Skip juice grooves, inlays, and complicated patterns. Those details can look great, but they add chances to make a small error that turns into a visible problem.
Gluing up the panel without making a mess of it
Spread a consistent layer of glue on each mating edge. You want complete coverage, but not so much that glue is pouring everywhere. Clamp the strips together with enough pressure to close the seams. More pressure is not always better. If you overdo it, you can force too much glue out and create alignment problems.
Use clamps above and below the panel if you can. That helps keep the strips from slipping out of plane while you tighten everything down. Check the top surface with your hand as you go. If one strip is sitting high, tap it gently into place before the glue sets.
Then leave it alone long enough. Beginners often rush this part. Follow the glue manufacturer’s cure time, not just the minimum clamp time. A panel that feels solid after an hour may still not be ready for heavy sanding or trimming.
Flattening, trimming, and sanding
Once the glue has cured, scrape off dried squeeze-out. Then flatten the board as needed. If you have a planer wide enough, that can save time, but many beginners use a random orbital sander. It takes longer, but it works if you stay patient and check your progress often.
Trim both ends square with a miter saw, circular saw with a guide, or table saw sled. That one step does a lot for the finished look. Even a well-glued board can look homemade in the wrong way if the ends are uneven.
When sanding, work through the grits instead of jumping straight to a very fine paper. Start where the surface needs it, often 80 or 100 grit, then move to 120, 150, and 180 or 220. For a cutting board, sanding too high is not always better. An ultra-polished surface can make it harder for finish to soak in evenly. Around 180 or 220 is a solid stopping point for most boards.
Break the sharp edges slightly. A crisp corner chips more easily and feels rough in use. You can do this with a router and round-over bit, but sandpaper alone works fine for a first board. Just make the edge comfortable in the hand.
How to make a cutting board for beginners that lasts
The build is only half the job. The finish and long-term care are what keep a board useful in a real kitchen.
Use a food-safe finish such as mineral oil or a cutting board oil blend. Some makers follow with a board wax for a little extra moisture resistance and a softer sheen. Flood the surface, let it absorb, then wipe off the excess. Repeat until the wood stops drinking it in quickly.
Do not use film-building finishes like standard polyurethane on a working cutting board. They can look nice at first, but once the surface gets cut and worn, the finish can fail in ways that are not ideal for food prep. Oil finishes are easier to renew, and that matters because every cutting board needs maintenance.
A board also needs the right care after it leaves the shop. Never soak it. Never put it in the dishwasher. Wash it by hand, dry it promptly, and re-oil it when the surface looks dry or chalky. A well-made board can last for years, but only if it is treated like wood and not plastic.
Common beginner mistakes and when it depends
The biggest mistake is poor wood selection. If the stock is not dry and stable, the board may warp no matter how carefully you glue it. Another common issue is uneven clamping, which leaves ridges that take a lot of sanding to fix.
Board thickness is one of those it-depends choices. Thicker boards feel premium and resist warping better, but they also get heavier and require more material. For a gift board or everyday kitchen board, 3/4 inch to 1 inch is usually a good balance. If you want a large butcher block style board, thicker may make sense.
Feet are another judgment call. Rubber feet can improve airflow underneath and help keep the board from sliding, but they also make the board single-sided. If you want both sides usable, leave them off.
If your first board has small gaps, uneven color, or a little more character than planned, that does not mean the project failed. Handmade woodwork has a learning curve. What matters is whether the board is flat, solid, food-safe, and pleasant to use.
When buying one may make more sense
There is real satisfaction in building your own board, especially if you enjoy hands-on projects. But there is also a point where custom sizing, premium lumber selection, or gift-level finish quality may be better left to a dedicated wood shop. That is especially true if you want a larger butcher block board, a specific wood combination, or dimensions that need to fit a particular kitchen setup.
That is where a maker-focused business like Tooill Cabinets fits naturally. Some customers want the pride of making their first board themselves. Others want handcrafted results without trial and error. Both are valid.
If you are building your first cutting board, keep it simple, buy the best wood you can justify, and take your time on the glue-up and sanding. Those two stages do more for the final result than any decorative detail ever will. A plain board built well will outlast a flashy one built in a hurry, and that is a lesson worth carrying into every wood project after this.